
CO2 Notifications using Home Assistant
During the summer we moved back to our house in Oslo. During summer the doors and windows are frequently open, so we get a lot of fresh air, and consequently CO2 levels are not an issue.
During autumn and now as we approach winter, the temperatures drop to below 10 degrees celcius, meaning the doors and windows are closed most of the time.
Since we live in an older house, primarily built with plaster and wood, we figure CO2 was not an issue. That was until my wife had a look at the CO2 measurements on her Netatmo Weather Station App. The CO2 level was above 1200 ppm.
My wife is professionally involved in ensuring air quality in buildings, schools, hospitals etc, so she basically went into a panic immediately saying we were all going to die! (Okay, maybe not exactly panic, but she was conerned).
Given that I have the Netatmo configured in Home Assistant, I figured I could build an automation to warn us whenever the CO2 levels rise above a certain level.
The Automation
I am NOT going to explain how to integrate the Netatmo, you can probably figure that out by yourself.
Adding a new automation in Home Assistant is rather simple if you have an idea about what you want to automate.
Go to Settings – Automations & Scenes: Press the big blue button “Create Automation” and you get a modal window like the following:
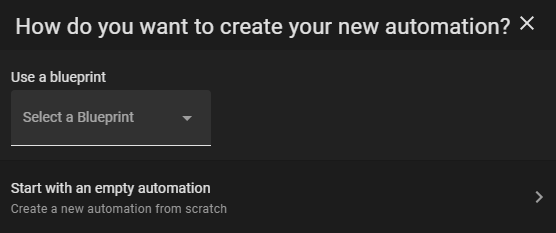
Now you can either use an existing blueprint found online (or built by you, but then you are not reading this!), or you can start from scratch. Since this is really simple, lets just start with an empty automation.
The Trigger
First of we need a trigger – something that should kick off our action (the notification).
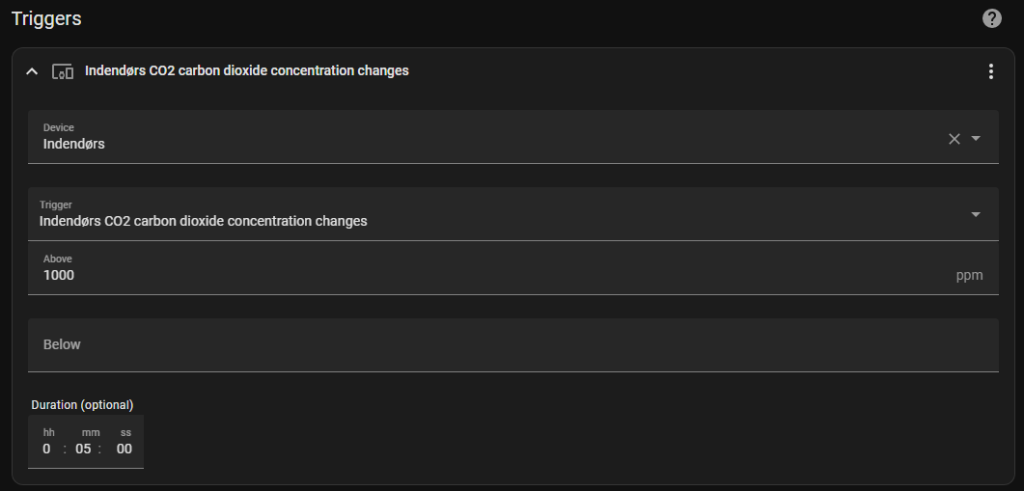
You can either use the visual editor and add a “Device” trigger, and find the indoor CO2 sensor and enter the appropriate values. Or if you know your device id you can just copy/paste the following yaml and change the device and entity id.
type: carbon_dioxide
platform: device
device_id: --YOUR DEVICE ID--
entity_id: sensor.netatmo_indendors_co2
domain: sensor
above: 1000
for:
  hours: 0
  minutes: 5
  seconds: 0
This basically tells the trigger to fire whenever the CO2 level has been above 1000ppm for 5 minutes.
In the UI editor it looks something like this
The Action
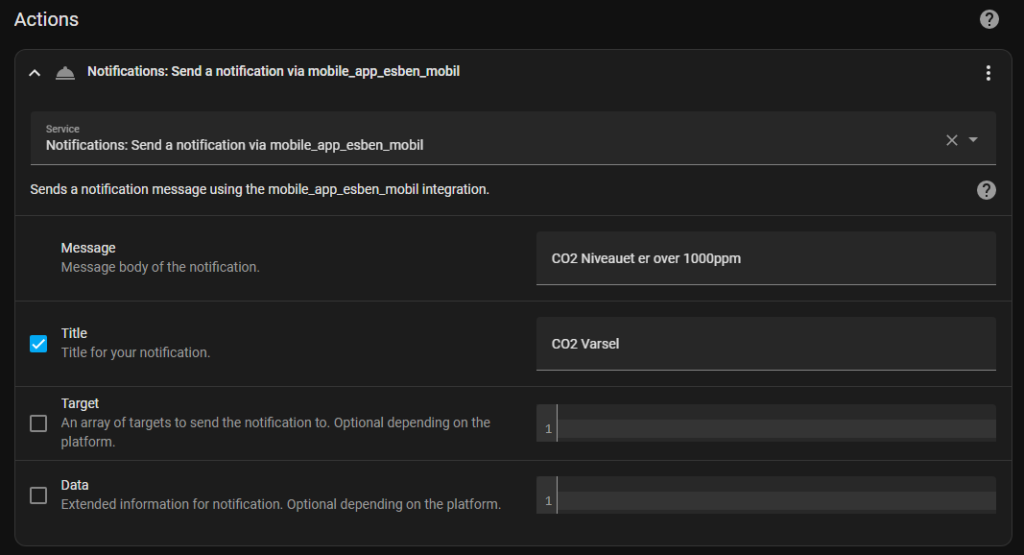
Second we need an action. The notification in this case.
Its also pretty simple. Just choose a Service and select the mobile device.
The End Result
We now have a VERY simple CO2 Warning mechanism, and we actually open our doors and windows a bit more often!
It is on the todo list to buy a LED strip for the living room, and it seems like an obvious target for an expansion of this automation. Something like shortly flashing the lights or changing the colours when the CO2 level rises.
If I ever get around to it ill try and do a post about how it works.
The right/wrong time to start with home automation
One of my main concerns with smart home/home automation/home information technology has always been the maturity. There are a lot of different standards, some open, some licensed, some entirely proprietary.
As a newcomer into the home automation scene, you have to consider a lot of competing “crap”: ZigBee, Z-Wave, Bluetooth Low Energy (BTLE), Wifi, Mbus, Knx, HomeKit – and it seems this list just goes on and on and on.
As a consumer this is annoying to say the least, if everything worked together, it would not be that bad. But it does NOT. Buying home automation tech, feels like vendor lock in – and it should not.
Luckily, it seems like we might soon be getting a solution called Matter. A protocol with a lot of the major tech and home automation companies behind it. The list includes Google, Amazon, Apple and IKEA (yes they sell LOTS of home automation stuff!).
Matter is a protocol meaning, it defines a set of actions and re-actions that is predictable between vendors. It sits on top of the IP Protocol (as far as I can glean its IPv6). This in itself is not so new, there have been IP based protocols before, but because of power consumption issues they have NOT been the most prominent.
Since all the heavy hitters are involved, the market expects Matter to be our “final” solution. The thing that FINALLY lets us have home automation products without the worry and hours and hours of research that goes with it. Of course that is not going to be the entire truth, but even the skeptic in me believes this is really going to be the thing that makes home automation “just work”.
Should I buy into the home automation scene now?
Is it the right time to start working with home automation? The answer is going to be a really big “maybe”.
Since matter is a software stack that sits on top of radio tech like ZigBee, Thread and Wifi, many battery based devices that run Thread, ZigBee or Z-Wave today, will not be upgraded to Matter directly. Instead the connectivity hubs they are talking with, will receive updates.
Most Wifi based devices are fed power directly, so many of them will receive Matter compatibility updates, but its totally up to each manufacturer.
Trying to answer the question, I would say no, wait 6 months and see where the market is heading. As soon as the Matter protocol is done, manufacturers are going to spew out hardware and firmware updates, and if you device is not upgraded or connected to an upgraded hub within an additional 6 months, don’t expect it to ever be.
That does not mean its useless, it just means you need to keep using the Hub/Bridge you were using already, and won’t be able to buy a drop-in replacement without some research.
Waiting 6 months will probably save you from buying hardware that is on the way out, without anyone knowing it! Once Matter is finally out, I am confident that it WILL be the RIGHT time to get started with home automation.
That said, lots of home information can be done without these fancy protocols and wireless/radio based devices – and you can always jump onto that wagon.
Introducing our house and the hardware setup
I live in a woodden house from 1965, which underwent a major change (it was split into two) in 1987. That is, its NOT a new house. The living area covers two floors, with a basement/garage underneath.
Since I live in Norway the primary heating source is my wood stoove and electric heating panels.
I have a very tech skeptic wife, and two boys and everyone needs to live with my various ideas and “improvements”. So pretty much like everyone else I guess.
Infrastructure Hardware
I have so far not invested in a lot of infrastructure, but rather started to better utilized what I had. So the entire setup is mostly run using:
- A Synology NAS DS412+
- Two Ubiquity APs (UAP-AC-Lite)
- Lots of ethernet cabel
- An Aeotec SmartThings Hub (for controlling my Z-Wave and ZigBee things)
- A pfSense based router (a small rugged device I installed pfSense onto)
In addition I have various Z-wave and ZigBee enabled “things” lying around, some bought recently but most bought years ago because I was dreaming!
Notable Sensor/Support Hardware
Of course there are some additional devices in the house, I already mentioned some ZigBee/Z-wave devices. These are just run-of-the-mill sensors and plugs.
A few other interesting devices are present though
- Netatmo Weatherstation (Indoor + Outdoor + Wind Gauge + Rain Gauge)
- Pow-U AMS Reader (https://amsleser.no/hjem/7-pow-u-universal.html)
The Pow-U is the most important one, but the Netatmo is the only “smart device” my wife bought, so it deserves a special mention 🙂
Software
Most of the software I have running is on the Synology NAS the setup is currently as follows:
- Docker (to ease my installation burdens)
- Ubiqity Unifi controller (Docker Image)
- Home Assistant (Docker Image)
- Eclipse-Mosquitto – MQTT Broker (Docker Image)
Originally I intended my home automation adventure to be based solely/primarily on the software provided with the Aeotec Hub.
Luckily I discovered Home Assistant, and now my Aeotec Hub is mostly used as a bridge for the z-wave/zigbee devices. I might get rid of it at some point. Who knows.
Enough text, here are my current dashboards in Home Assistant:
A weather/environment overview

Since everything is in danish/norwegian here is a short explanation:
The left column displays my living room environment, the temperature, CO2 concentration and humidity.
The middle column displays rain and humidity outside.
The right column the average wind speed and wind gusts (along with the direction).
All thanks to the Netatmo sensors!
A simplified Power overview:

The middle column displays my current power usage, and the predicted percentage of fossil fuel used to deliver said power.
The right column depicts the 3 phases and their current/voltage levels currently.
The current power information is all thanks to the Pow-U while the nordpool thing is an online service.
Of course the built in energy dashboard of Home Assistant deserves a prominent display, though I mostly use it to see my historic power consumption (which I can also find online at my power company)

I am not going to explain how all of this was installed, but in one of the next blog posts I will try and go into some of the details of getting the power integration up and running.